Immediately after the release of the MarvelClient Upgrade Free Edition, I started testing. Here are my first steps with MarvelClient Upgrade Free.
Want to learn how to easily use the MarvelClient Upgrade Free Edition?
Detailed information about Panagenda MarvelClient Upgrade Free Edition on the product site www.panagenda.com

Minimal prerequisites:
- You are using either the free MarvelClient Essentials or a licensed variant of MarvelClient.
- The MarvelClient Configuration and Analyze databases already exist on at least one IBM Domino Server in your environment.
- Make sure you have the latest MarvelClient components available by running an Online Update in the MarvelClient configuration database. The local mc.dll / pmc.dll version on the user’s computers must be minimal 10.x.
- Ensure you have all needed installation packages, you plan to deploy, available on your administration computer, e. g. : IBM Notes 10.0.1 English (NOTES_V10.0.1_FOR_WIN_EN.exe), IBM Notes 10.0.1 Multilingual User Interface – Group 1, NOTES_CLIENT_10.0.1_ML_UI_WIN_GP_.exe
MarvelClient Upgrade Free will only support the following installation packages:
- IBM Notes 10.0.1 English or any other available language
- IBM Notes 10.0.1 Multilingual User Interface – Group 1, 2a, 2b and 3
- IBM Notes 10.0.1 Fix Pack 1
- IBM Swift File 4.2.1
How to create an IBM Notes upgrade package:
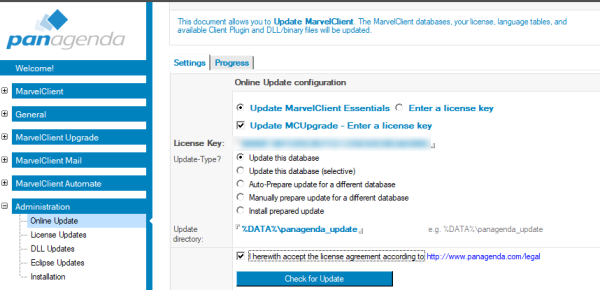
- If you received a license key must be used from within the MarvelClient Configuration database, Administration\Online Update After entering the license key, run Online Update to download the Upgrade components
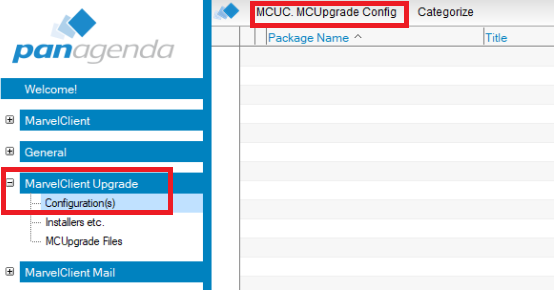
2. Open the MarvelClient Configuration database, expand the “MarvelClient Upgrade” section in the navigation, open the “Configuration(s)” view and create a new “Upgrade Configuration” action
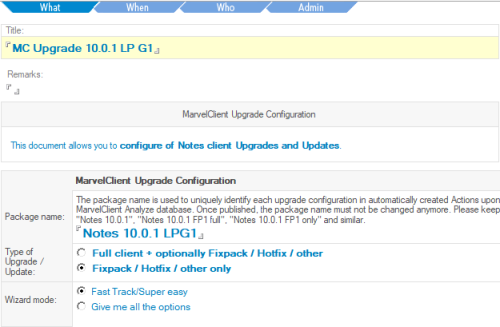
3. In the upper part of this Action, specify the “Title” and “Package name
Additionally, options for “Type of Upgrade / Update” and “Wizard mode” must be selected. For this scenario we choose: Type of Upgrade / Update: Full client + optionally Fixpack / Hotfix / other and Wizard mode: Fast Track / Super easy
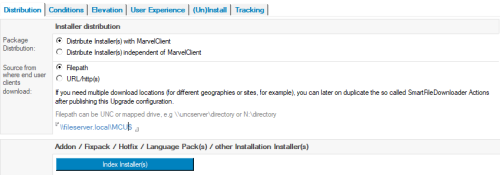
4. On the Distribution tab you can choose whether the package distribution to your clients will be handled by MarvelClient itself or your very own solution. If MarvelClient is to deploy the package, you must specify from which source the clients will download the upgrade package. You can choose between a file path (UNC or a mapped drive) and a URL (https or http). On the Distribution tab you can also index your installation packages to select them for your Upgrade.
Note: So please choose path one which exists in your environment. For example: \fileserver.local\MCU$
5. To index the “Full Client Installer”, click on “Index Installers)”, select the IBM Notes 10.0.1 installation package and click on “Open”.
MarvelClient will then automatically create the working folder for the build process (“%public%\MCUpgrade\build), detach MCUpgrade.exe and license_upgrade.xml into that folder.
Similar to indexing and selecting the full client install package, we can now also add the other installer packages

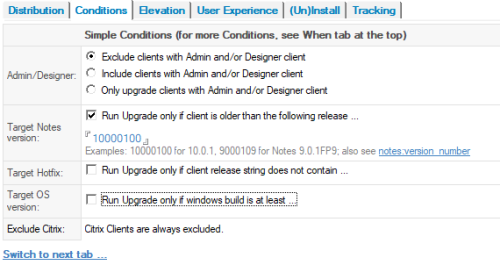
6. On the Conditions tab you can easily choose the required conditions for upgrade configuration.
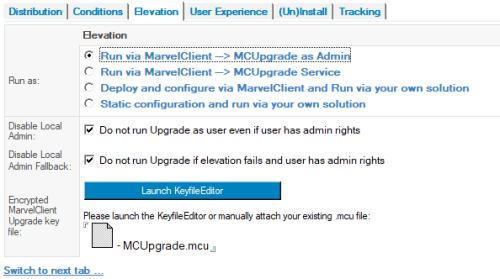
7. Elevation Tab. To be able to install software on a user’s computer, MarvelClient allows you to choose from the following options:
• Run via MarvelClient → using a local or domain account with local administration rights
• Run via MarvelClient → using the MarvelClient Upgrade Windows Service
• Deploy and configure the upgrade with MarvelClient and run via your own solution
• Static configuration and deploy and run via your own solution
We will use “Run via MarvelClient → MCUpgrade as Admin” = “using a local built-in administrator account”, because most users do not have Windows administrator rights.. To ensure that the Upgrade is exclusively done with your provided Admin user credentials.
To create the needed keyfile with administrative credentials (.mcu file) click to “Launch KeyfileEditor”
8. Enter the account name (Administrator) and corresponding password on the following screen.
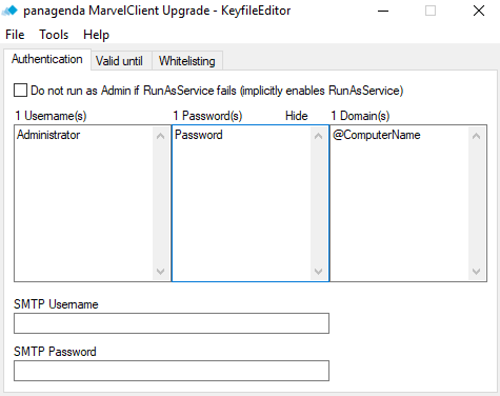
9. Save the “MCUpgrade.mcu” file. After saving your MCUpgrade.mcu file and closing MCKeyfileEditor, your .mcu file will be attached to your upgrade configuration automatically.

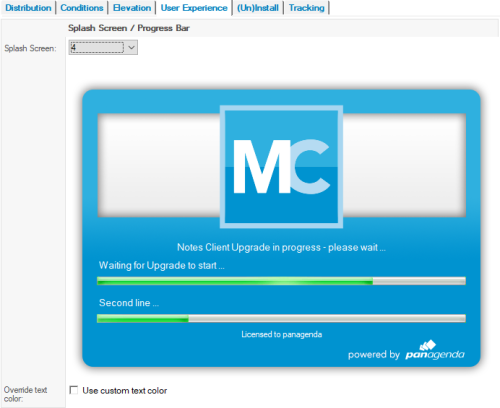
10. During the Upgrade process, MarvelClient Upgrade will show a Splash Screen with progress bars. MarvelClient Upgrade Free customers can choose between 10 different designs, which can be configured on the User Experience Tab.
11. One of the most important tabs of the MarvelClient Upgrade Wizard is the (Un)Install tab, which controls whether the current client will be uninstalled before the new installation gets executed and the exact command lines for the full client and/or additional install packages and their order of execution.
Recommendation: If you are not just installing a Fix Pack and/or other additional packages, but a full client package you uninstall the current IBM Notes client using NICE
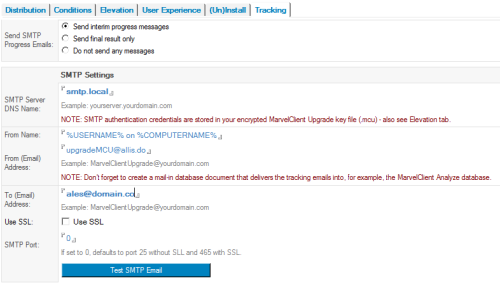
12. Tracking tab. MarvelClient Upgrade is able to send so called “interim progress messages” during an upgrade, as well as final “success” or “fail” reports at the end of an upgrade via SMTP.
13. The last thing we need to do now is to publish “Upgrade Configuration”. The “Prepare or Publish Upgrade” button will first prepare all necessary components in %PUBLIC%\MCUpgrade\stage. Upon completion of preparation, it will ask you whether you want to publish the upgrade into MarvelClient Action that will take care of the rest.
We choose YES for publishing, which then creates all needed MarvelClient Actions automatically, so that all corresponding Notes client are automatically upgraded to Notes 10.0.1.

IMPORTANT: Once again, please make sure to configure your test scope and respective target users on the “When” and the “Who” tab before going for “all users at once”:
If you do not configure any of the above tabs, then ALL USERS will get the client upgrade.
14. Upgrade process.
If the user logs in to the Notes client, a window with the client upgrade information appears. The client then closes and the upgrade starts.

15. The upgrade progress will then be displayed. At the same time, you will be notified by email as we configured on Tracking Tab

The installation and configuration was very intuitive and in a very short time I reached the upgrade of the first Notes client.
Yes, it was in a test environment.
I also tested FP1 installation and I think it was even easier.
And what about you?
Great! Just what I needed!
A perfect way to upgrade the Notes Clients.
Thanks for the description of the steps.